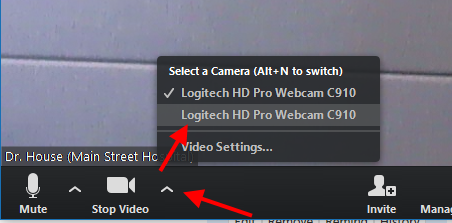
Select camera device
Your default camera should automatically be selected when the meeting starts, but you can change this device if you have multiple camera devices.
1. Click anywhere on the video window so the menu panel appears at the bottom.
2. Click on the arrowhead to the RIGHT of the video camera icon, and a list of all detected cameras will appear. Click on the camera you would like to switch to.
If you do not see a video camera icon with "Start/Stop Video" underneath it, no camera driver was detected for your computer.
Return to top
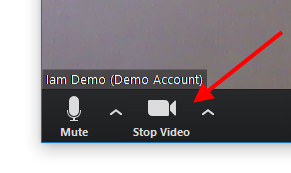
Turn off/on camera
Your camera is off by default when entering a meeting.
1. Click anywhere on the video window so the menu panel appears at the bottom.
2. Click on the camera icon to toggle between enabling and disabling the selected camera. If you see "Stop Video", that means your camera is currently turned on (image on the left). If you see "Start Video", that means your camera is currently turned off (image on the right).

If you do not see a video camera icon with "Start/Stop Video" underneath it, no camera driver was detected for your computer. If you see "Stop Video" but only see a black screen where your video should be, another application may be using your camera device.
Return to top
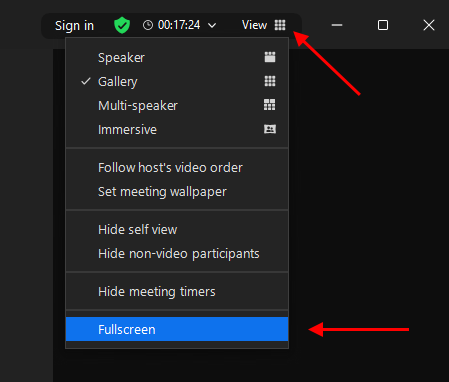
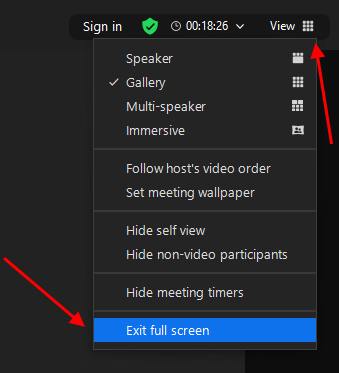
Enter/exit full screen
1. Click "View" at the top right corner on the video window so the menu panel appears.
2. Scroll down to Full screen or Exit Full screen at the bottom.
- Or use the keyboard shortcut: ALT+F
Return to top
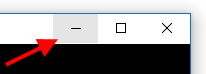
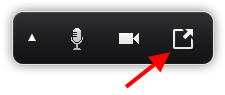
Minimize/unminimize video
You can minimize your video window if it is getting in the way by clicking on the icon that looks like an underscore, in the upper right hand corner of the video window. (If you do not see this underscore, you may have to exit fullscreen first.)
This will shrink the video windows down to the small box that displays the active speaker. To un-minimize your video window, move your cursor over the small box and click on the icon that looks like a box with an arrow coming out of it (left). If you've minimized the video window and removed the displayed video, you'll only see the toolbar, but it will still have the option to exit minimized video (right).

Return to top
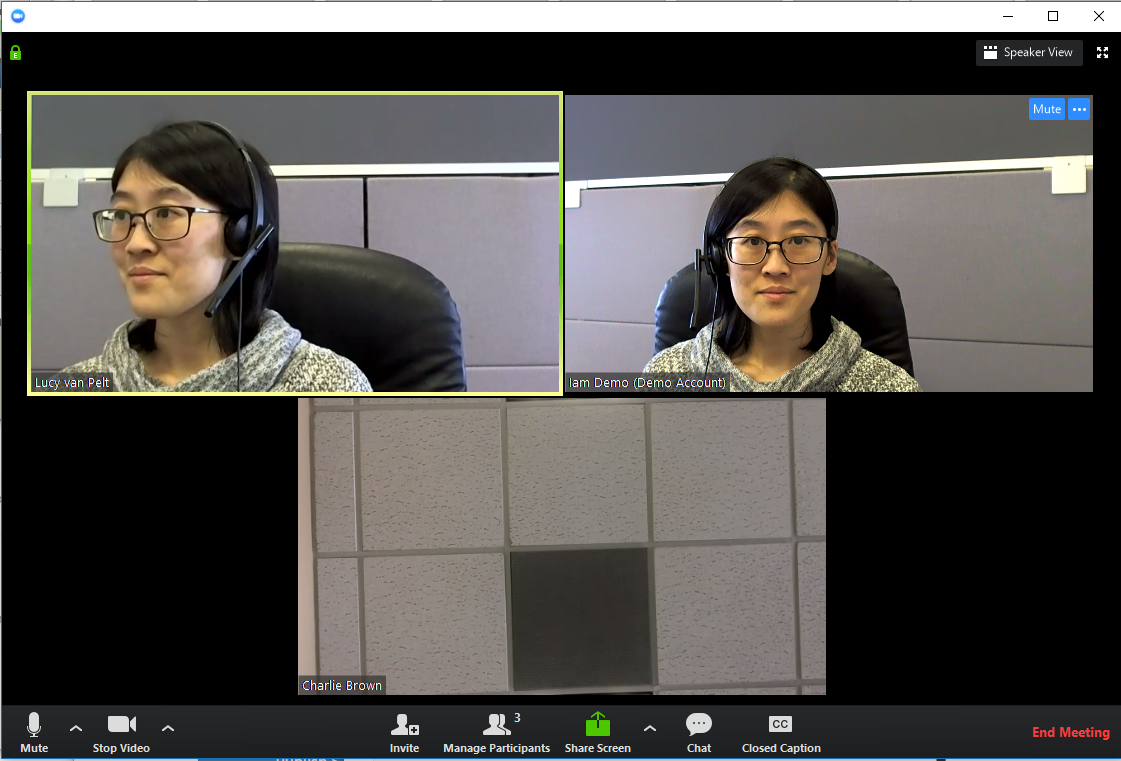
Speaker View
Speaker View is the default view for a videoconference--it shows the participant actively speaking as a large video window, and all other participants are in smaller video windows gathered at the top of the application window.
- Exception: you will not appear as Active Speaker for yourself. When you speak, the Active Speaker will appear (on your screen) to be the last person that spoke, rather than show a large video window of yourself.
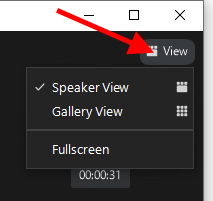
If you are on Gallery View and want to change to Speaker View, click anywhere on the video window, and then click on the "Speaker View" button that appears in the upper right hand corner of the video window.
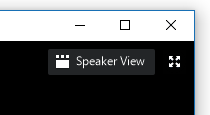
On newer versions of Zoom, it may only be a "View" button, where you can then click "Speaker View" to select it.

Return to top
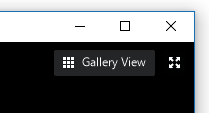
Gallery View
Gallery View shows all participant video feeds the same size as one another.
If you are on Speaker View and want to change to Gallery View, click anywhere on the video window, and then click on the "Gallery View" button that appears in the upper right hand corner of the video window.
On newer versions of Zoom, it may only be a "View" button, where you can then click "Gallery View" to select it.
Return to top
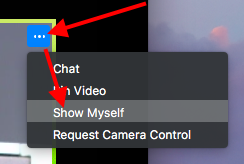
Hide/show yourself (to yourself) in Gallery View
If you would not like to see yourself during a session, you can hide yourself while you are in Gallery View. (This will not hide your video feed for other participants.)
To hide yourself, click anywhere on your video window (the one showing yourself), and then click on the three dots that appear in the upper right hand corner. Select "Hide Myself" from the menu that appears.
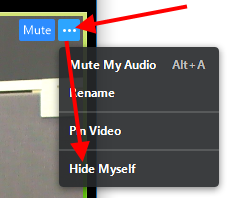
To unhide yourself, click on any other participant's video window, and then click on the three dots that appear in the upper right hand corner. Select "Unhide Myself" from the menu that appears.
Return to top
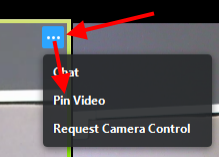
Pin video
If you are in a group session and would like to be able to always see one person's video as large, and the other participants as smaller windows, you can pin that person's video window to your screen. This will not affect the view for anyone else in the session.
To pin a video window, click anywhere on their video window (the one showing the participant you want to pin), and then click on the three dots that appear in the upper right hand corner. Select "Pin video" from the menu that appears.
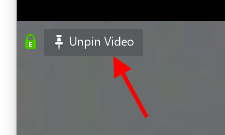
To unpin a video window, click on the "Unpin Video" in the upper left hand corner of the pinned video.
Return to top
Request camera control
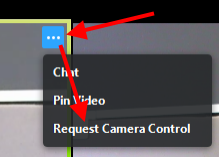
If another participant has a PTZ camera, you can request remote control of it.
To request control, click anywhere on their video window, and click on the three dots that appear in the upper right hand corner. Then select "Request Camera Control" from the list that appears.
The participant will see a request message, and must click "Approve" to grant you access to their camera.
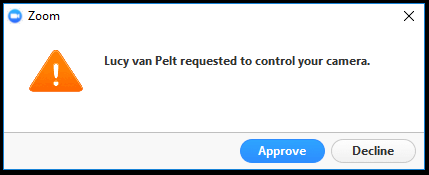
You will automatically change to speaker view, and camera controls will appear on the video window.
- If they have multiple cameras, you will see a "Switch Camera" button along the top of their video window:

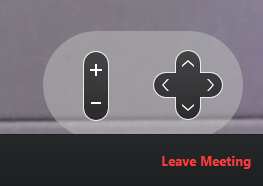
- If they have pan, tilt, and/or zoom capability, you will see those controls in the lower right hand corner of their video window:
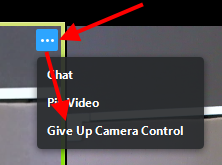
If you would like to stop controlling the camera, switch back to Gallery View, and then click anywhere on their video window. Click on the three dots that appear in the upper right hand corner, and select "Give Up Camera Control".
Return to top
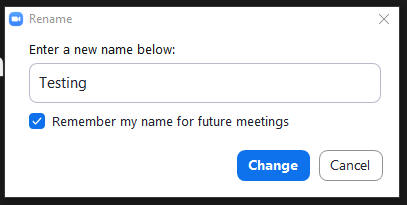
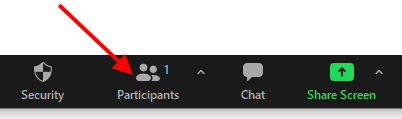
Rename yourself
1. Click on the "Participants" button at the bottom of the video panel.
2. In the panel that appears to the right, move your cursor over your own name and click "More", and the word "Rename" will appear. Click on "Rename".
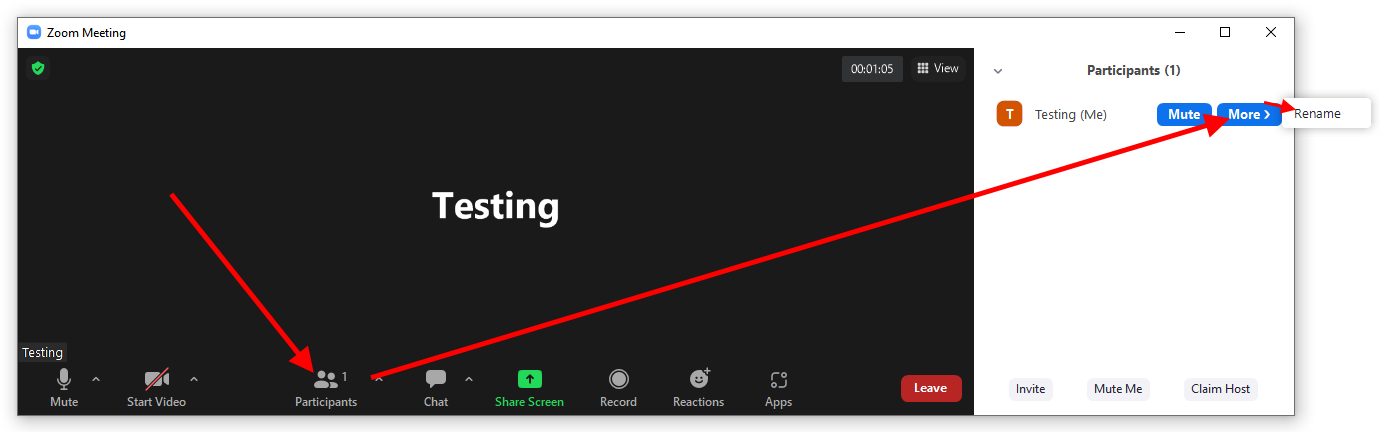
3. In the window that appears, type your new name and click "Change".
Return to top
General settings
There are different general settings that you can edit for yourself.
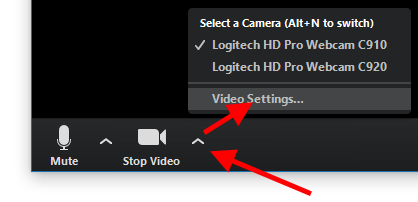
1. Click anywhere on the video window so the menu panel appears at the bottom.
2. Click on the arrowhead to the RIGHT of the video camera icon, and then click on "Video Settings".
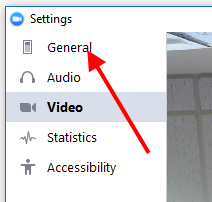
3. In the window that appears, click on the "General" option in the upper left hand corner.
4. A new window will appear with the General settings as checkbox-options:
- Application:
- Start Zoom when I start Windows (Windows computers only, but leave this disabled.)
- Silently start Zoom when I start Windows (Windows computers only, but leave this disabled.)
- When closed, minimize window to the notification area instead of the task bar. (Windows computers only.)
- Automatically copy Invitation URL to Clipboard after meeting starts (Irrelevant; the host invites new participants from their SecureVideo dashboard.)
- Confirm with me when I leave a meeting: controls whether or not the confirmation message appears when you click "Leave/End Meeting".
- Show meeting timers: If enabled, shows a timer in the upper left hand corner of the Zoom meeting window, showing how long you have been in this meeting.
- Content Sharing:
- Use dual monitors: this will display your video session in two duplicate windows instead of a single window.
- Enter full screen automatically when starting or joining a meeting
- Enter full screen automatically when viewing screen shared by others
- Maximize Zoom window automatically when viewing screen shared by others
- Scale to fit my Zoom window when viewing screen shared by others
- Enable screen sharing with GPU acceleration (Windows computers only.)
- Enable the remote control of all applications (Windows computers only.)
- Side-by-side Mode: enables you to view shared screens in side-by-side mode.
Return to top
Video settings
There are different general video settings that you can edit for yourself.
1. Click anywhere on the video window so the menu panel appears at the bottom.
2. Click on the arrowhead to the RIGHT of the video camera icon, and then click on "Video Settings".
3. A new window will appear with a preview of your video feed, and a list of checkbox-options:
- Camera: this will show your selected camera, with a drop-down menu to allow you to choose other cameras, and two checkboxes:
- Original ratio: 4:3 ratio, if that is the default supported by your camera
- HD: enable High Definition video; selected by default if supported by your camera.
- My Video
- Mirror my video: allows you to view your video feed as if looking into a mirror. Does not mirror your video to other participants.
- Touch up my appearance: applies a slight blur to your video feed (e.g., smooth out skin coloring or make flyaway hair less noticeable); there's a sliding scale that you can adjust
- Adjust for low light
- Manual: use a sliding scale to choose the adjustment
- Auto: allow Zoom to adjust lighting (if your lighting is often changing, this may be more suitable)
- Meetings:
- Always display participants name on their video (this setting is overriden by the "Participant Names in Zoom/One-Click Sessions" setting in your Options)
- Turn off my video when joining meeting (this setting is overridden by Zoom when launching a session from a website like SecureVideo; your camera is always turned off at the beginnig)
- Hide Non-Video Participants: this would hide the blank window that appears for participants that join by telephony
- Enable stop incoming video feature: this setting allows you to save on bandwidth by not displaying anyone's video feed
- See myself as the active speaker while speaking
- Maximum participants displayed per screen in Gallery View: for large group meetings, you can increase the number of participants normally shown on a page before the applications begins to paginate. (By default, the number of participants will vary according to the size of your screen. For a normal desktop monitor ~16", this number is 25. Video windows decrease in size as you add more windows in Gallery View. This setting can only be enabled if your computer processor meets minimum requirements to bear the load.) Options:
- 25 participants
- 49 participants (with yourself, it will be 50)
- Advanced button:
- Optimize video quality with de-noise: enable Zoom to try to smooth out video quality
- "Use hardware acceleration for" -> this will try to enhance resources available by relying more on your device's resources. (This may sometimes cause issues if compatibility is lacking.)
- video processing
- sending video
- receiving video
- Video Rendering Method: Allows you to choose what graphics API to render the video. By default, this is set to Auto, but other options include Direct3D11 Flip Mode, Direct3D11, Direct3D9, and GDI. (Best not to touch this unless you have specific need.)
- Video Rendering Post Processing: Processes the video after it has been captured. By default, this is set to Auto, but other options include Enable and Disable. (Best not to touch this unless you have specific need.)
- Video Capturing Method: Allows you to choose which multimedia framework to use for video. By default, this is set to Auto, but other options include Direct Show and Media Foundation. (Best not to touch this unless you have specific need.)
Return to top
Accessibility settings
You can view all keyboard shortcuts within the Zoom application.
1. Click anywhere on the video window so the menu panel appears at the bottom.
2. Click on the arrowhead to the RIGHT of the video camera icon, and then click on "Video Settings".
3. In the window that appears, click on the "Accessibility" option in the upper left hand corner.
- Always show meeting controls: Check this box to always display the meeting controls on the video window (instead of allowing them to fade, and neeting to click somewhere on the video window to bring them back)
- Windows: You can also use the Alt key to show/hide meeting controls instead of clicking.
- Mac: You can also use the "Control + \" to show/hide meeting controls
- Closed Caption Font Size: Slide scale to the desired size.
- Only has an effect if host has enabled closed captioning, and assigned a participant to type captions as the meeting occurs.
- Windows Keyboard Shortcuts:
- Navigate among Zoom popup windows: F6
- Change focus to Zoom meeting controls (at the top when sharing your screen, at the bottom when not sharing: Ctrl + Alt + Shift
- View the previous 25 video participants in Gallery View: PageUp
- View the next 25 video participants in Gallery View: PageDown
- Toggle the 'Always show meeting controls' option in Settings/Accessibility: Alt
- Switch to Speaker View: Alt+F1
- Switch to Gallery View: Alt+F2
- Start/Stop video: Alt+V
- Mute/Unmute my audio: Alt+A
- Mute/Unmute audio for everyone except host (available only to the host): Alt+M
- Start/Stop share screen: Alt+S
- Show/Hide windows and applications available to share: Alt+Shift+S
- Pause/Resume Share (available only when you are sharing your screen): Alt+T
- Start/Stop local recording: Alt+R (if enabled)
- Start/Stop cloud recording: Alt+C (if enabled)
- Pause/Resume recording: Alt+P (if enabled)
- Switch camera: Alt+N
- Enter/Exit full screen mode: Alt+F
- Display/Hide chat: Alt+H
- Display/Hide Manage Participants: Alt+U
- Open the invite window: Alt+I
- Raise/Lower Hand: Alt+Y
- Gain remote control: Alt+Shift+R
- Stop Remote Control: Alt+Shift+G
- Mac Keyboard Shortcuts:
- Mute/Unmute my audio: Command+Shift+A
- Start/Stop video: Command+Shift+V
- Switch camera: Command+Shift+N
- Start/Stop share screen: Command+Shift+S
- Pause/Resume share (available only when you are sharing your screen): Command+Shift+T
- Start/Stop local recording: Command+Shift+R
- Start/Stop cloud recording: Command+Shift+C
- Enter/Exit full screen mode: Command+Shift+F
- Switch to minimal window: Command+Shift+M
- Mute audio for everyone except host (available only to the host): Command+Control+U
- Unmute audio for everyone except host (available only to the host): Command+Control+U
- Switch to speaker view: Command+Shift+W
- Switch to gallery view: Command+Shift+W
- View the previous 25 video participants in gallery view: Control+P
- View the next 25 video participants in gallery view: Control+N
- Display/Hide chat: Command+Shift+H
- Display/Hide manage participants: Command+U
- Raise hand/Lower hand: Option+Y
- Gain remote control: Ctrl+Shift+R
- Stop remote control: Ctrl+Shift+G
Return to top
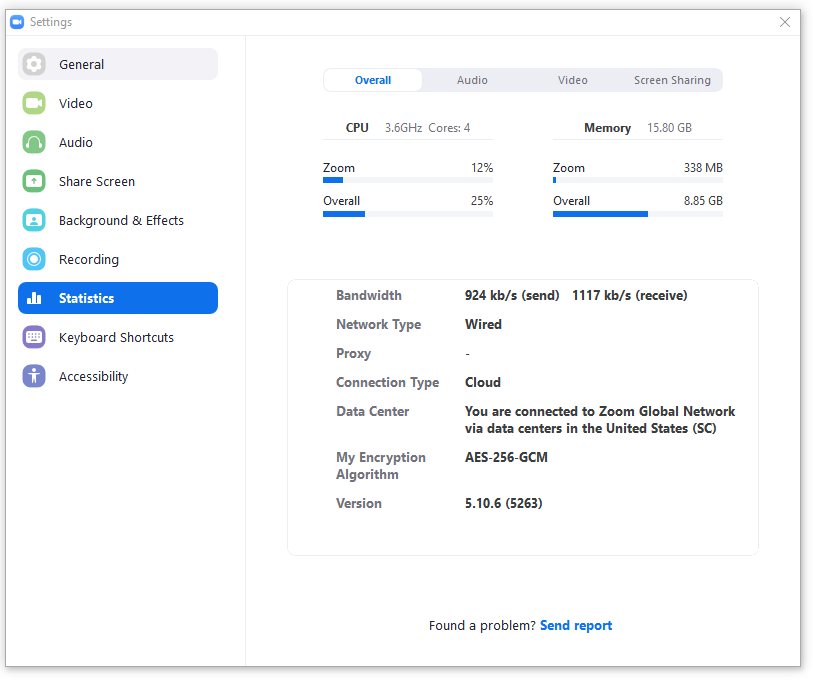
Statistics
You can view call statistics on resource usage within the Zoom application, while in a session.
1. Click anywhere on the video window so the menu panel appears at the bottom.
2. Click on the arrowhead to the RIGHT of the video camera icon, and then click on "Video Settings".
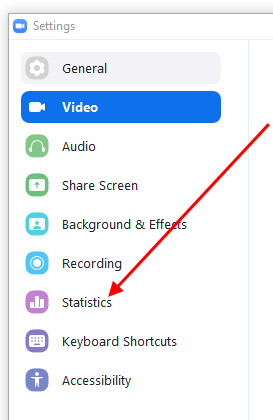
3. In the window that appears, click on the "Statistics" option on the left hand side.
4. On the right, you will see general statisitcs on your CPU and Memory usage (both for the Zoom application alone and your computer as a whole). If you have a lot of other programs open or doing things, you may have much less CPU or Memory available for your Zoom session.
You can also see how much bandwith you are using to send video or receive video feed(s) from others. These numbers will fluctuate but should stay within 100kb/s; outside of that range, your or their connection may be unstable.
- You can click on the "Audio" or "Video" tabs for more details.
- Latency: delay between when video is transmitted and when it's received. If this is under 100 milliseconds, it's generally not noticeable, although ideally it will be less than 20 ms.
- Jitter: the variation in time delay between when video is transmitted and when it's received. If you have high variation, you'll have very jerky video as opposed to smooth. This number should ideally be in the single digits.
Return to top
Application Settings for Hosts
Host: screensharing settings
As the host, you have the ability to allow or restrict screensharing. (By default, all participants have the ability to share their screen if no one is already sharing.)
1. Click the ^ symbol to the right of the "Share Screen" button, and then select "Advanced Sharing Options".
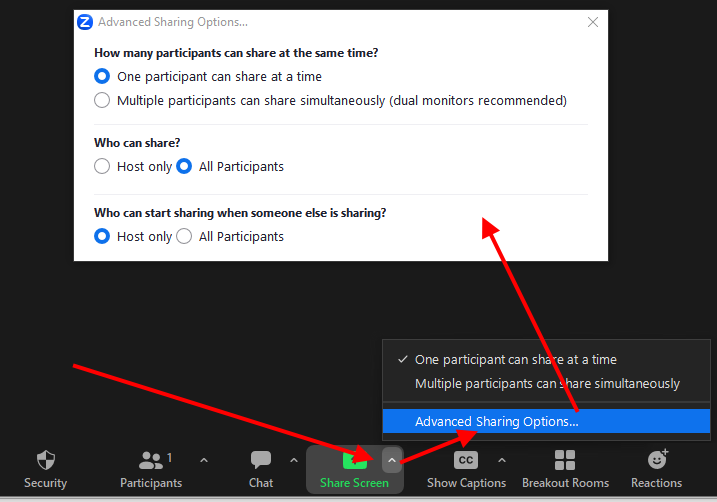
You can change:
- How many participants can share at the same time?
- Default: One participant can share at a time
- Multiple participants can share simultaneously (dual monitors recommended)
- Who can share?
- Host only
- Default: All Participants
- Who can start sharing when someone else is sharing?
- Default: Host only
- All Participants
Return to top
Host: mute/unmute a participant
As the host, you have the ability to mute or unmute other participants. (By default, the participant can still unmute or mute themselves after you have adjusted their settings.)
To mute or unmute a participant, click anywhere on their video window, and click on the "Mute" (or if already muted, "Unmute") button that appears in the upper right hand corner.
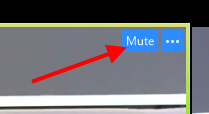
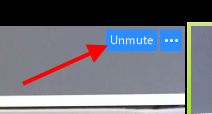
If you would like to prevent the participant from un-muting themselves, you can disable that setting.
1. Click anywhere on the video window, and then click on the "Manage Participants" button that appears along the bottom.
2. When a new panel appears, click on the "..." option in the lower right hand corner, and then make sure that "Allow participants to unmute themselves" is not checked.

Return to top
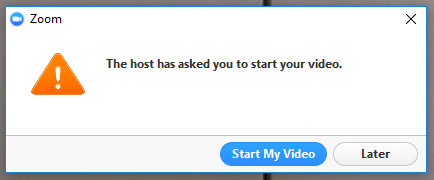
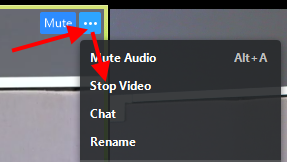
Host: enable/disable a participant's camera
As the host, you can request a participant turn on their camera and have the ability to turn off the camera for other participants. (The participant will not be able to turn their camera back on unless you re-enable it.)
If a participant forgets to turn on their camera, click anywhere on their video window, and click on the three dots that appear in the upper right hand corner. Then select "Ask to Start Video" from the list that appears.

The participant will see a pop-up appear asking them to start their camera.
- If they choose "Start My Video", the message will go away and their camera will turn on.
- If they choose "Later", the message will be dismissed without the camera turning on.
To disable a participant's camera, click anywhere on their video window, and click on the three dots that appear in the upper right hand corner. Then select "Stop Video" from the list that appears.
Return to top
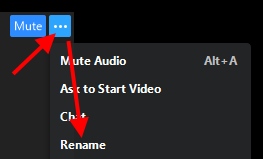
Host: rename a participant
A participant's name displays in the lower left hand corner of their video window. To change what displays here, you can rename the participant within the meeting. (Please note: this will NOT change the name that is used in the session history record, which always uses the contact name.)
To rename a participant mid-meeting, click anywhere on their video window, and then click on the three dots that appear in the upper right hand corner. Then select "Rename" from the list that appears.
Return to top
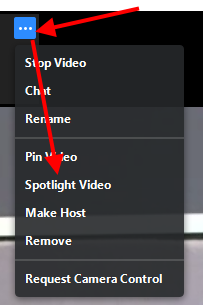
Host: spotlight
If you are in a group session (3 or more participants including yourself) and would like ALL participants to be able to always see one person's video as large, and the other participants as smaller windows, you can set a spotlight on that person's video. As the host, only you will be able to set or remove a spotlight.
To spotlight a person, click anywhere on their video window, and then click on the three dots that appear in the upper right hand corner. Then select "Spotlight Video" from the list that appears.
- If you already have 1 video feed that is spotlighted, then the option will be "Add Spotlight".
- If you are on Speaker View, the three dots will appear on the person's video window at the top of the application window. Or, switch to Gallery View first.
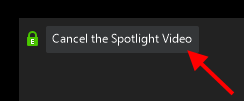
To remove the spotlight from that person, click on the "Cancel Spotlight Video" button in the upper left hand corner of their video window.
Return to top
Host: make another participant the host/a co-host
You can make another participant host of the session, and they will have additional privileges.
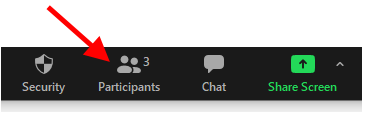
1. To make another participant the host, click anywhere on the video window, and then click on the "Participants" button that appears along the bottom.
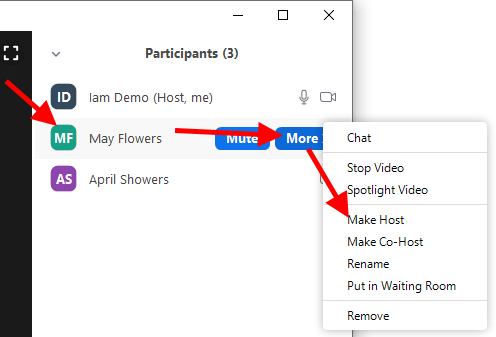
2. Hover your mouse over their name and click the "More" button, and then select "Make Host"/"Make Co-Host" from the drop down menu.
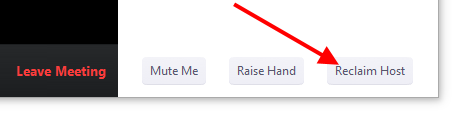
1. If you made the participant the sole Host, they can transfer the host role back to you with the same steps, or you can reclaim it. Click anywhere on the video window, and then click on the "Participants" button that appears along the bottom.
2. In the panel that appears, click on the "Reclaim Host" button in the lower right hand corner.
Return to top
Host: lock/unlock meeting
If you want to prevent additional participants from entering the meeting, you can lock it.
1. Click anywhere on the video window, and then click on the "Participants" button that appears along the bottom.
2. When a new panel appears, click on the "..." option in the lower right hand corner, and then select "Lock Meeting".
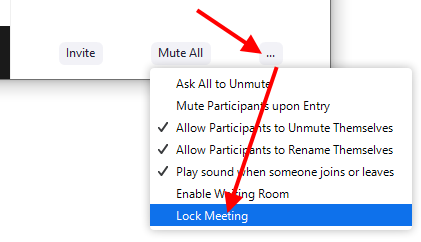
3. If new participants try to enter the meeting, they'll see a notification that the meeting has been locked by the host.

Return to top
Host: play sound when someone joins or leaves
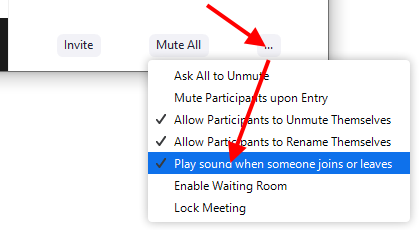
By default, a sound chimes when someone enters or leaves. You can disable/enable this while in a meeting.
1. Click anywhere on the video window, and then click on the "Participants" button that appears along the bottom.
2. When a new panel appears, click on the "..." option in the lower right hand corner, and then select "Play sound when someone joins or leaves" to check or uncheck the setting.
3. If new participants try to enter the meeting, they'll see a notification that the meeting has been locked by the host.
Return to top
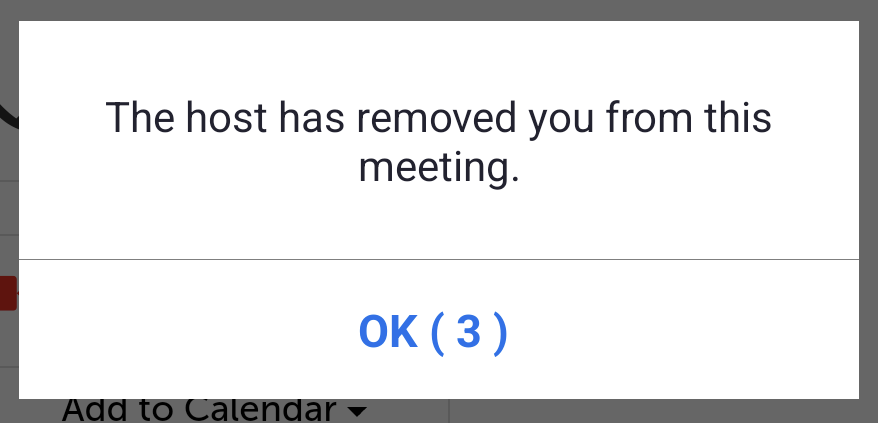
Host: remove a participant
If you want to disconnect a current participant from the session, you can. However, unless you also lock the meeting afterward, they can just re-enter.
1. To remove a participant, click anywhere on their video window, and then click on the three dots that appear in the upper right hand corner. Then select "Remove" from the list that appears.
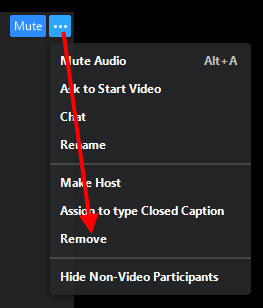
2. The participant will be notified with a short message (lasting 5 seconds): The hos has removed you from this meeting.
Return to top
This article was last reviewed by our Support team on January 19, 2021.